How to Download Image from AWS S3 Bucket in Laravel 10
In this guide, we'll show you how to download images from your AWS S3 bucket using Laravel 9/10, the popular PHP web application framework. Retrieving images from AWS S3 is an essential skill for many web applications, and we're here to make it easy for you.
We'll break down the process into simple steps, accompanied by clear instructions and code snippets. By the end of this tutorial, you'll be well-equipped to seamlessly integrate your Laravel application with AWS S3 and retrieve images from your bucket, enhancing the functionality of your web project.
Let's get started how to download S3 files using laravel 8, laravel 9, and laravel 10, how to download files from S3 bucket using PHP.
If you haven't already, create a new Laravel project or use an existing one.
composer create-project --prefer-dist laravel/laravel laravel-aws-S3-example
First, we need to create an AWS S3 bucket and an IAM User to get started. Let's walk through the necessary steps:
-
Begin by visiting the Amazon Web Services Console and create your AWS account if you don't have one. If you already have an account, simply log in.
-
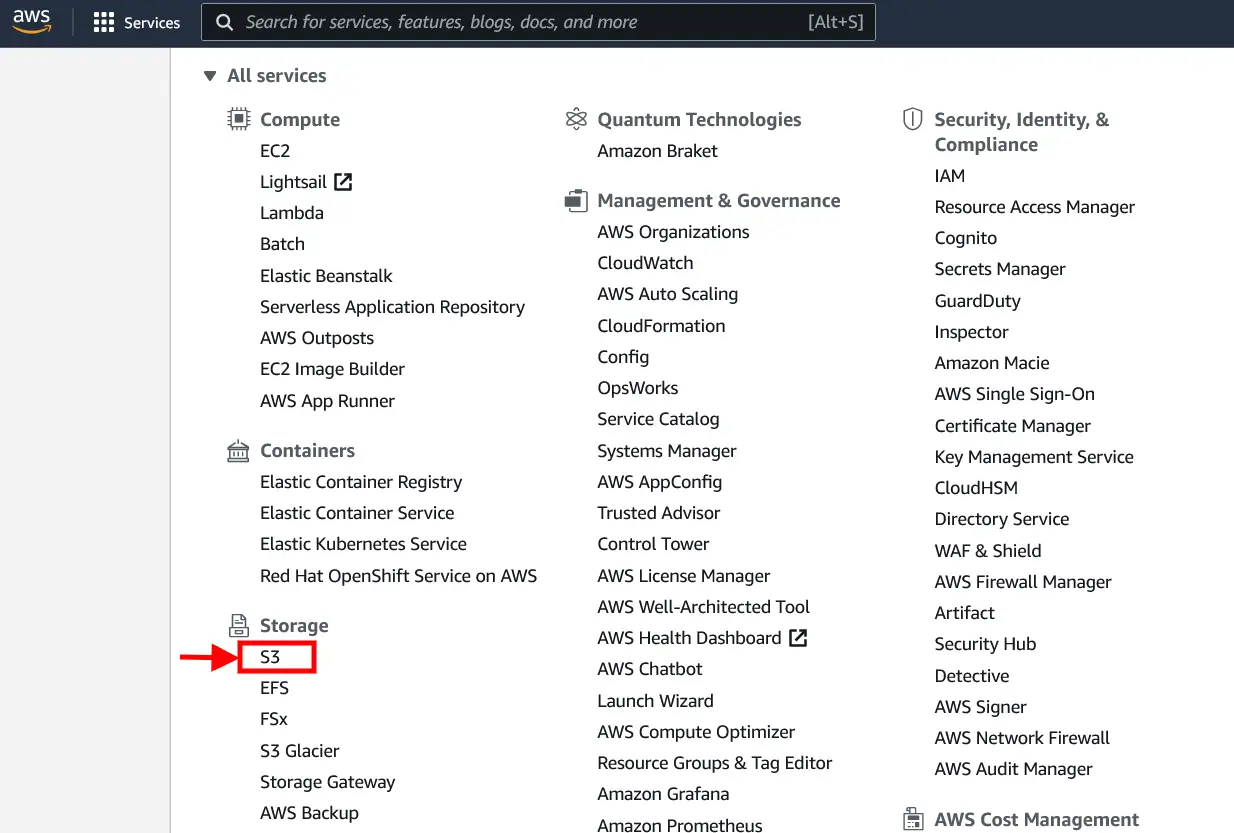
Next, navigate to "All Services" and select "S3" under the "Storage" category, which can be found in the menu. Alternatively, you can use the search bar to locate "S3" as shown in the screenshot below. This is where you'll set up your S3 bucket and configure the required settings.
These initial steps are crucial in preparing your AWS environment for image download and storage with Laravel 10
3. After selecting "S3" under the "Storage" category. Here, you should click on the "Create Bucket" button to initiate the process of creating a new S3 bucket for your image storage needs.
4. Upon clicking the "Create Bucket" button, you'll be presented with a bucket creation form. In this form, the primary detail you need to provide is the "Bucket name." However, you can customize other settings according to your specific requirements.
After filling in the necessary information, proceed to click the "Create bucket" button located at the bottom of the screen. This action will establish your new S3 bucket, ready to store the images you'll be uploading with Laravel 10
5. To enable secure access to your S3 bucket and the ability to upload files from Laravel, you'll need to create an IAM (Identity and Access Management) User. Follow these steps:
- Click here to create an IAM User, or alternatively, you can search for "IAM" in the service list, and then select "Users."
Creating an IAM User is essential for managing access permissions and ensuring the security of your AWS resources, including the S3 bucket you've just created. This user will be configured to interact with your Laravel application.
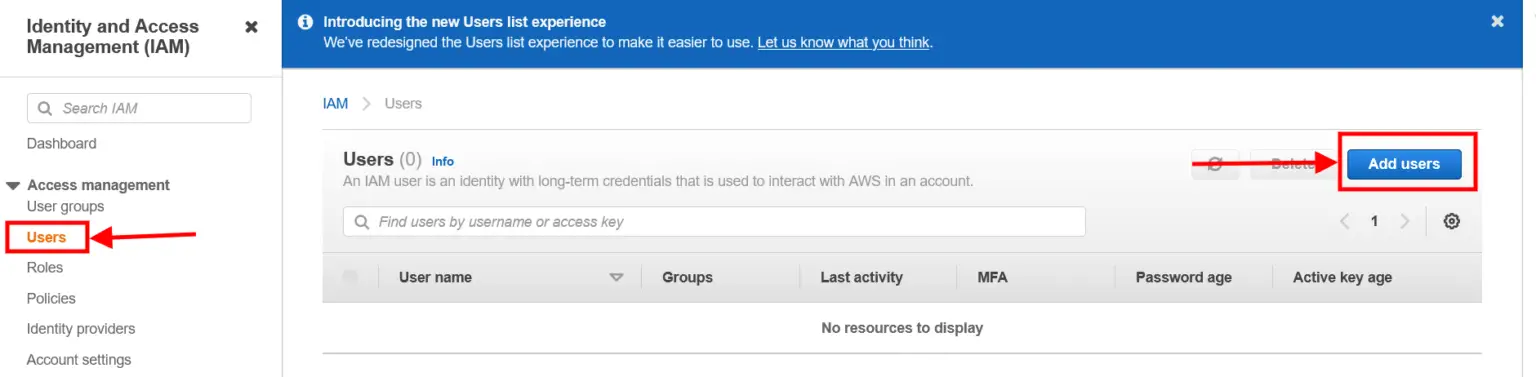
Click on the “Add users” button as shown above.
6. In the "Add User" form, you will need to provide the following information:
-
User name: Enter a suitable name for your IAM User. This will be used to identify the user, and it's a good practice to choose a name that reflects its purpose or role.
-
Access type: Select "Programmatic access." This option allows the user to interact with AWS services through API calls, which is what you need to enable AWS S3 interactions from your Laravel application.
Once you've filled in this information, proceed by clicking the "Next" button. This will lead you to the next steps in creating the IAM User.
7. In the next step of creating your IAM User, follow these instructions:
-
Select the tab labeled "Attach Existing Policies Directly." This option allows you to directly assign pre-defined AWS policies to your IAM User.
-
From the list of available permissions, find and select "AmazonS3FullAccess." This policy provides your user with full access to Amazon S3, allowing them to list, upload, and manage objects in S3 buckets.
After selecting "AmazonS3FullAccess," click the "Next" button to proceed. This step ensures that your IAM User has the necessary permissions to interact with your S3 bucket.

8. At this stage, you can optionally add tags to your IAM User for better organization and resource tracking. Tags can help you categorize and manage your AWS resources, but they are not mandatory. If you don't wish to add tags, you can simply skip this step by clicking the "Next" button.
After skipping or adding tags, you'll arrive at the "Review" step. Here, you can review the details you've entered for the IAM User to ensure they are accurate. Once you've verified the information and are satisfied with your selections, click the "Create user" button to complete the user creation process.
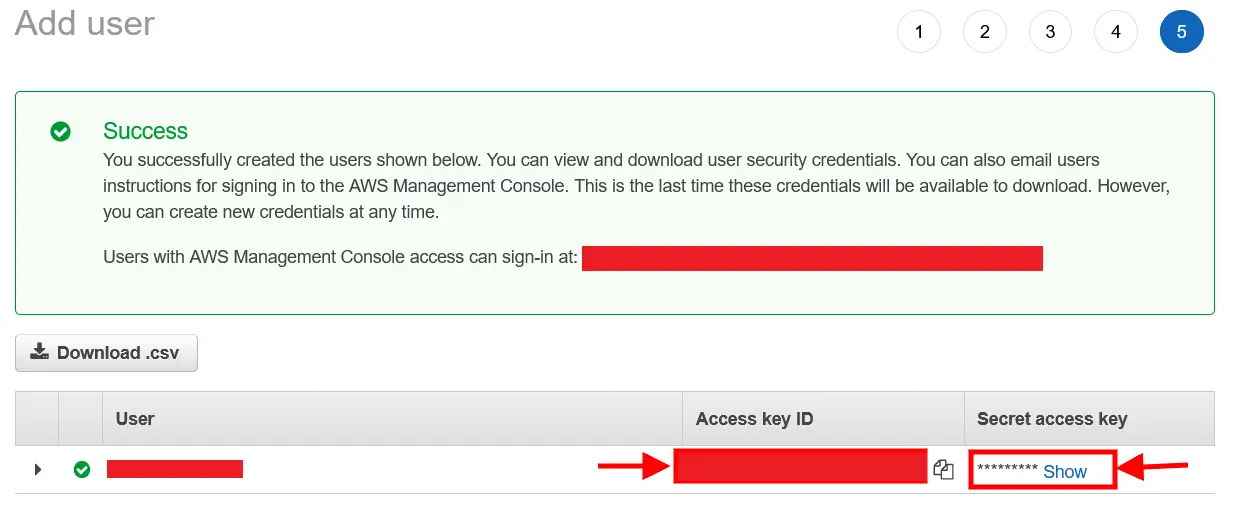
9. After successfully creating the IAM User, you will receive a confirmation message, and a list of newly created users will be displayed, similar to the screenshot provided. Within this list, you will find two essential pieces of information:
-
Access Key ID: This is a unique identifier for your IAM User, which will be used in your Laravel application to authenticate with AWS S3.
-
Secret Access Key: This is a secret key that complements the Access Key ID. It should be kept confidential and used to authenticate your Laravel application with AWS S3.
You will need both the Access Key ID and Secret Access Key to configure your Laravel application to connect with your AWS S3 bucket. Make sure to securely store these keys, as they are vital for the integration.
To establish a connection between your Laravel application and AWS S3, you'll need to install the Flysystem adapter for the AWS S3 SDK v3.x.
This package simplifies the process of interacting with S3. Open your terminal and run the following command to install the necessary package.
composer require league/flysystem-aws-s3-v3
In your Laravel project, open the .env file and add your AWS S3 credentials.
AWS_ACCESS_KEY_ID=your-access-key-id
AWS_SECRET_ACCESS_KEY=your-secret-access-key
AWS_DEFAULT_REGION=your-region
AWS_BUCKET=your-s3-bucket
If you are running your web app without https protocol then you have to follow this else you will get the aws http error: curl error 60: ssl certificate problem: unable to get local issuer certificate error.
Open the config\filesystems.php and add the 'scheme' => 'http' in ‘s3’ array like below:
config\filesystems.php
's3' => [
    'driver' => 's3',
    'key' => env('AWS_ACCESS_KEY_ID'),
    'secret' => env('AWS_SECRET_ACCESS_KEY'),
    'region' => env('AWS_DEFAULT_REGION'),
    'bucket' => env('AWS_BUCKET'),
    'url' => env('AWS_URL'),
    'endpoint' => env('AWS_ENDPOINT'),
    'use_path_style_endpoint' => env('AWS_USE_PATH_STYLE_ENDPOINT', false,
    'scheme'  => 'http'
],
In your routes/web.php file, define a route that handles the image download.
<?php

use Illuminate\Support\Facades\Route;
use App\Http\Controllers\ImageController;

Route::get('download', [ImageController::class, 'index']);
Create a controller that handles the image download. You can generate a controller using Artisan.
php artisan make:controller ImageController
app/Http/Controllers/ImageController.php
<?php

namespace App\Http\Controllers;

use Illuminate\Http\Request;
use Illuminate\Support\Facades\Storage;
use App\Models\Image;

class ImageController extends Controller
{
    public function index(Request $request)
    {
        $id = 1;
        $attachment = Image::find($id);

        $headers = [
            'Content-Type'        => 'application/jpeg',
            'Content-Disposition' => 'attachment; filename="'. $attachment->name .'"',
        ];

        return \Response::make(Storage::disk('s3')->get($attachment->url), 200, $headers);
    }
}
Now, run the following command in your terminal to initiate the development server:
php artisan serve
In this guide, you've learned how to successfully download images from your AWS S3 bucket in Laravel 10, a valuable skill for enhancing the functionality of your web application.
We've provided you with clear and straightforward steps to seamlessly integrate your Laravel project with Amazon S3, allowing you to retrieve and display images stored in the cloud.
You might also like:
- Read Also: How to Upload Image in AWS S3 in Laravel 10
- Read Also: Laravel 10 CKEditor Image Upload Example
- Read Also: How To Upload Image In Summernote Editor In Laravel 9
- Read Also: How To Convert Image Into Base64 String Using jQuery


