How To Validate Form Using jQuery Validate.js
In this article, we will explore the process of validating forms using jQuery and the Validate.js library. We'll dive into frontend form validation and utilize Validate.js, a lightweight JavaScript library that offers a declarative approach to validating JavaScript objects.
This library, inspired by CodeIgniter, requires no external dependencies and is incredibly compact, with a gzipped size of just over 2kb.
We'll demonstrate how to validate various input fields using jQuery and the Validate.js library. While backend validation is essential, it typically occurs after the form is submitted.
With frontend validation, we can provide real-time feedback to users, enhancing the user experience and data accuracy.
Learn More: Validate.js
So, let's see the validate.js form example, form validation using jquery, email validation using jquery, checkbox validation using jquery, and URL validation using jquery.
There are three ways you can use validate js.
You can use the CDN file to validate the form.
<script src="//cdnjs.cloudflare.com/ajax/libs/validate.js/0.13.1/validate.min.js"></script>

OR

<script src="http://ajax.aspnetcdn.com/ajax/jquery.validate/1.11.1/jquery.validate.min.js"></script>
Also, you can install it using the npm command and use it.
$ npm install --save validate.js
var validate = require("validate.js");
Also, you can install validate js using bower.
$ bower install --save validate.js
Example:
<!DOCTYPE html>
<html>
<head>
    <title>How to validate form using jquery validate.js - Techsolutionstuff</title>
    <link rel="stylesheet" href="https://maxcdn.bootstrapcdn.com/bootstrap/4.0.0/css/bootstrap.min.css">
</head>
<style>
    label.error {
        color: red;
    }
</style>
<body>
<div class="col-md-6 ml-2">
<div id="top-nav" class="navbar navbar-inverse navbar-static-top">
    <div class="container-fluid">
        <div class="navbar-header">
          <h4 class="mt-2">How to validate form using jquery validate.js - Techsolutionstuff</h4>
        </div>
    </div>
</div>
<div class="container-fluid">
    <form id="myForm" data-validate="true" data-checkrealtime="true">
        <div id="field1">
            <div class="form-group">
                <label for="name">Your name</label>
                <input class="form-control" id="name" name="name" type="text" placeholder="type your name"/>
            </div>

            <div class="form-group">
                <label for="mobile">mobile number</label>
                <input class="form-control" id="mobile" name="mobile" type="text" placeholder="type your mobile number"/>
            </div>

            <div class="form-group">
                <label for="email">Email</label>
                <input class="form-control" id="email" name="email" type="text" placeholder="type your email"/>
            </div>

            <div class="form-group">
                <label for="url">Website</label>
                <input class="form-control" id="website" name="website" type="text" placeholder="type your website name"/>
            </div>

            <div class="form-group">
                <input id="accept" name="accept" type="checkbox"/>
                <span>Accept conditions</span>
            </div>

            <div class="button-group">
                <button id="submitBtn" type="submit" class="btn btn-info" data-checkform="true">Submit</button>
            </div>
        </div>
    </form>
  </div>
</div>
  </html>
<script src="https://ajax.googleapis.com/ajax/libs/jquery/3.5.1/jquery.min.js"></script>
<script src="http://ajax.aspnetcdn.com/ajax/jquery.validate/1.11.1/jquery.validate.min.js"></script>
<script>
$(document).ready(function () {
    $('#myForm').validate({ // initialize the plugin
        rules: {
            name: {
                required: true,
            },
            mobile: {
                required: true,
                minlength: 8
            },
            email : {
                required: true,
                email: true
            },
            website: {
                url: {
                    allowDataUrl: true
                }
            },
            accept: {
                required: true,
            }
        }
    });
});
</script>
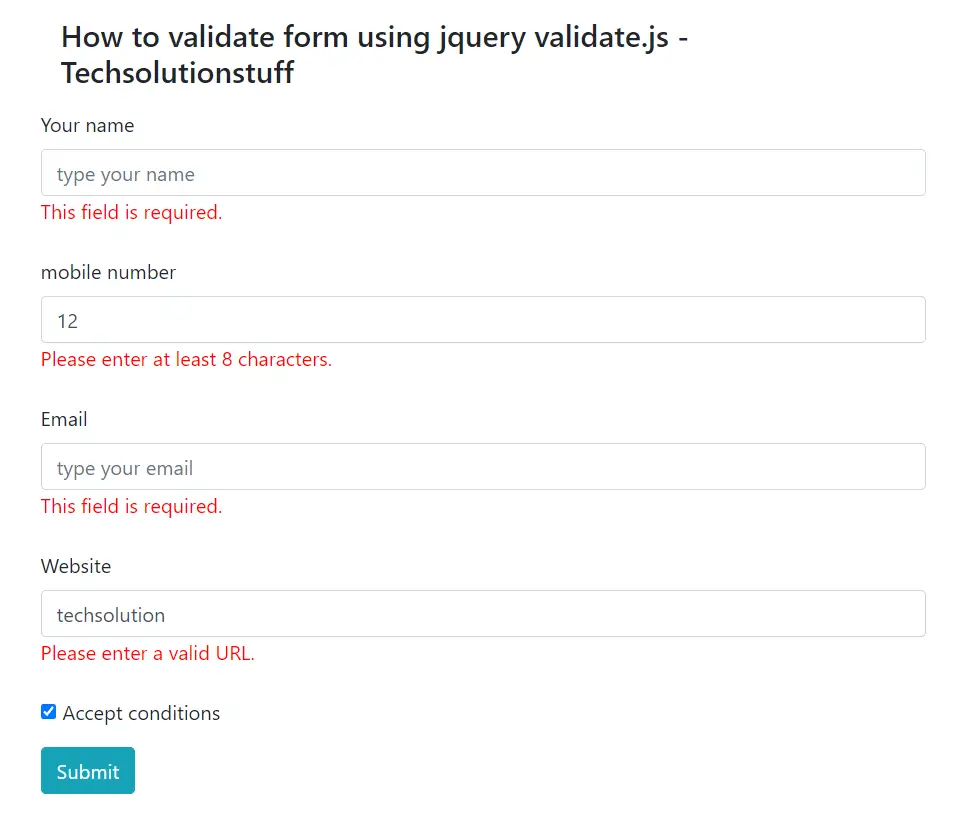
Output:

You might also like:
- Read Also: Laravel 8 Image Upload Validation
- Read Also: Laravel 8 Form Validation Example
- Read Also: Laravel Unique Validation on Update
- Read Also: How To Generate Invoice PDF In Laravel 9


