How to Install Apache with PHP-FPM on Ubuntu
In this article, we will explore the process of configuring Apache with PHP-FPM (FastCGI Process Manager) on Ubuntu. PHP-FPM is a FastCGI implementation for PHP that provides better performance and scalability compared to the traditional mod_php Apache module.
By configuring Apache to use PHP-FPM, you can enhance the processing of PHP files and improve the overall performance of your web applications.
In the following sections, we will provide you with a step-by-step guide on how to configure Apache with PHP-FPM on Ubuntu. We will cover the necessary installations and configurations to ensure seamless integration.
So, let's dive in and learn how to leverage the power of PHP-FPM with Apache on your Ubuntu system, how to install Apache with PHP-FPM on Ubuntu, php-fpm apache ubuntu, install php-fpm 7.4 Ubuntu, how to install PHP-FPM 8 in ubuntu, install php fpm 8.2 ubuntu 22.04.
Before installing any new software, you should update your system to ensure that all packages are up to date. So, update the package lists to include the PHP 8 packages. Run the following command.
sudo apt update
To install Apache on Ubuntu 22.04, run the following command in the terminal.
sudo apt install apache2
Once the installation is complete, you can start the Apache service by running the following command.
sudo systemctl start apache2
You can also enable Apache to start at boot time by running the following command.
sudo systemctl enable apache2
Next, make sure PHP-FPM and Apache are installed on your Ubuntu system. If not, you can install them using the following commands.
sudo apt install php8.2-fpm
PHP 7.4
sudo apt install php7.4-fpm
Restart Apache and PHP-FPM to apply the configuration changes
sudo systemctl restart apache2
sudo systemctl restart php8.2-fpm
To configure Apache to use PHP-FPM, you need to enable the “proxy_fcgi” and “proxy” modules. You can do this by running the following command.
sudo a2enmod proxy_fcgi proxy
Create a new configuration file for your virtual host using the following command:
sudo nano /etc/apache2/sites-available/example.com.conf
Note: Replace “example.com” with your domain name.
Inside the new configuration file, add the following configuration with PHP-FPM.
<VirtualHost *:80>
    ServerName example.com
    ServerAlias www.example.com
    DocumentRoot /var/www/html

    <Directory /var/www/html>
        Options -Indexes +FollowSymLinks +MultiViews
        AllowOverride All
        Require all granted
    </Directory>

    <FilesMatch \.php$>
        SetHandler "proxy:unix:/run/php/php8.2-fpm.sock|fcgi://localhost/"
    </FilesMatch>

    ErrorLog ${APACHE_LOG_DIR}/error.log
    CustomLog ${APACHE_LOG_DIR}/access.log combined
</VirtualHost>
Note: Adjust the “ServerName”, “ServerAlias”, “DocumentRoot” directives, and PHP FPM socket path to match your domain and desired file path.
Save and close the file by pressing CTRL+X, then Y and ENTER.
Enable the new virtual host by running the following command.
sudo a2ensite example.com.conf
Reload the Apache web server to apply the changes.
sudo systemctl reload apache2
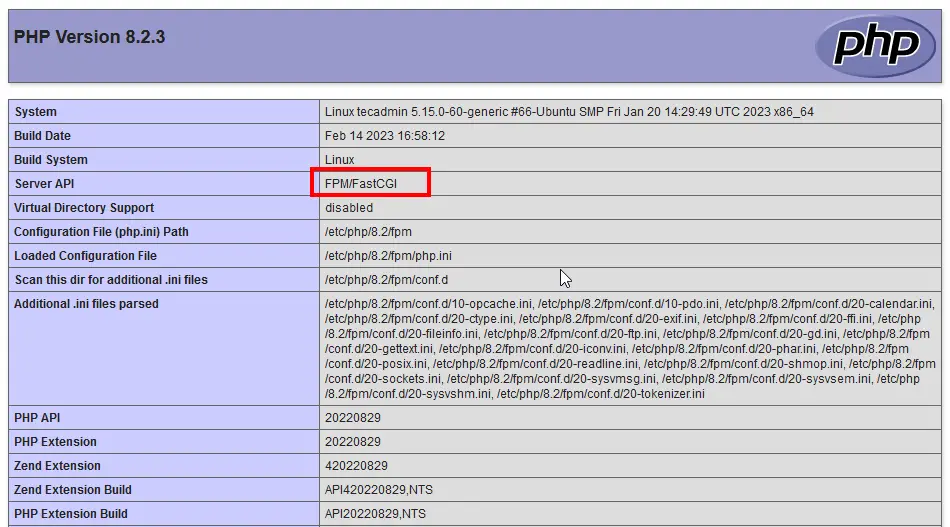
Create a simple PHP file to test if PHP-FPM is working with Apache. Create a file named info.php in your web server's document root (e.g., /var/www/html/) with the following content
<?php phpinfo(); ?>
Output:
You might also like:
- Read Also: How to Install PHP 8 on Ubuntu
- Read Also: How to Upgrade PHP 8.1 to 8.2 in Ubuntu
- Read Also: How To Import CSV File In MySQL Using PHP
- Read Also: Laravel 10 HTTP cURL POST Request With Header


