How To File Upload Using Node.js
In this article, we will see how to file upload using node.js. In this tutorial, I will give you a simple example of node js with express js file upload using multer. we can use the multer module for file uploading to the server. Multer is a node.js middleware that is used for handling multipart/form-data, which is mostly used library for uploading files.
So, let's see the file upload in node js express, node js express js file upload, node js file upload using multer, how to upload file using node js, file upload node js multer, multer file upload example node js, multer file upload in node js.
Visit Multer Package: Install Multer Module
In this step, we will create node application using the below command
mkdir express_js_file_upload

cd express_js_file_upload

npm init
In this step, we install ejs using the below command
npm install ejs
Now, we will install Express in the express_js_file_upload directory and save it in the dependencies list.
$ npm install express --save
In this step, we will install multer using the below command. Also, you can visit the link Install multer module.
npm install multer
In this step, we will create File_upload_form.ejs in the views folder. and add the below code in the file.
<!DOCTYPE html>
<html>
<head>
	<title>How To File Upload Using Node.js - Techsolutionstuff</title>
</head>
<body>
    <h1>How To File Upload Using Node.js - Techsolutionstuff</h1>
    <form action="/uploadFile" enctype="multipart/form-data" method="POST">
        <span>Upload File: </span>
        <input type="file" name="pic" required/> <br>
        <input type="submit" value="submit">
    </form>
</body>
</html>
Now, create an index.js file in your app directory. and add the below code in the index.js file
const express = require("express")
const path = require("path")
const multer = require("multer")
const app = express()

app.set("views",path.join(__dirname,"views"))
app.set("view engine","ejs")

var storage = multer.diskStorage({
    destination: function (req, file, cb) {
        cb(null, "uploads")
    },
    filename: function (req, file, cb) {
      cb(null, file.fieldname + "-" + Date.now()+".jpg")
    }
  })

const maxSize = 1 * 1000 * 1000;

var upload = multer({
    storage: storage,
    limits: { fileSize: maxSize },
    fileFilter: function (req, file, cb){

        var filetypes = /jpeg|jpg|png/;
        var mimetype = filetypes.test(file.mimetype);

        var extname = filetypes.test(path.extname(
                    file.originalname).toLowerCase());

        if (mimetype && extname) {
            return cb(null, true);
        }

        cb("Error: File upload only supports the "
                + "following filetypes - " + filetypes);
      }

}).single("pic");

app.get("/",function(req,res){
    res.render("File_upload_form");
})

app.post("/uploadFile",function (req, res, next) {

    upload(req,res,function(err) {

        if(err) {
            res.send(err)
        }
        else {
            res.send("Successfully Image uploaded..!")
        }
    })
})
app.listen(3000);
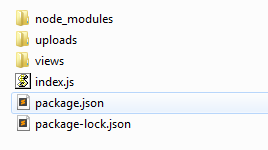
and your file structure like the below image

Note: create an uploads folder in the app for storing files.
Now, run index.js using the below code.
node index.js
You might also like:
- Read Also: Laravel 8 Import Export CSV/EXCEL File Example
- Read Also: How To Validate Upload File Type Using Javascript
- Read Also: How To Upload File On The FTP Server Using PHP
- Read Also: Laravel Summernote Editor Image Upload Example


