Laravel 12 Google Login with Socialite: Step-by-Step Tutorial
Hey, Laravel developers! I’m excited to share a simple guide on adding Google login to your Laravel 12 application using the Socialite package. Social logins make signing in quick and user-friendly, letting users access your app with their Gmail accounts without needing a separate username or password.
In this tutorial, I’ll walk you through setting up Laravel Socialite, configuring Google OAuth, and creating a seamless login experience.
Whether you’re using Laravel UI, Jetstream, or Breeze, this guide is beginner-friendly and easy to follow.
Prerequisites
Before we dive in, make sure you have:
- A Laravel 12 project set up.
- A Google Developer account (for OAuth credentials).
- Composer and npm installed.
Step 1: Install Laravel 12 Application
Let’s start by setting up a fresh Laravel 12 project if you haven’t already:
composer create-project laravel/laravel laravel-12-example
Navigate to your project directory:
cd laravel-12-example
Step 2: Install Laravel UI
To create a login and registration system, we’ll use Laravel UI for Bootstrap authentication scaffolding. Run:
composer require laravel/ui
Install the Bootstrap auth scaffolding:
php artisan ui bootstrap --auth
Install npm dependencies and build assets:
npm install
npm run build
Note: If you’re using Jetstream or Breeze, you can skip this step and adapt the routes/views accordingly.
Step 3: Install Socialite
Next, install the Laravel Socialite package to handle Google OAuth:
composer require laravel/socialite
Step 4: Create a Google App
To enable Google login, you need OAuth credentials from the Google Developer Console.
- Go to Google Developer Console.
- Create a new project (e.g., “Laravel Google Login”).
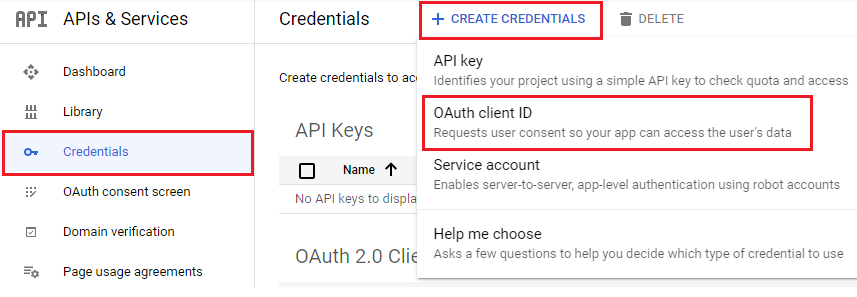
- Navigate to APIs & Services > Credentials > Create Credentials > OAuth Client ID.
- Select Web Application as the application type.
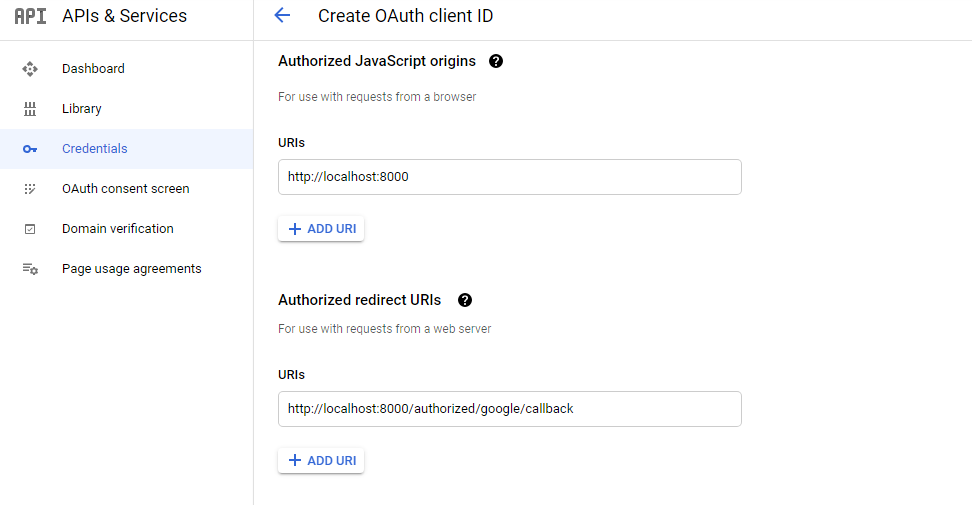
- Add your app’s redirect URI (e.g.,
http://localhost:8000/auth/google/callback) under Authorized redirect URIs. - Save and note down the Client ID and Client Secret.


Configure the credentials in your Laravel app:
Update config/services.php
<?php

return [
    // Other services...
    'google' => [
        'client_id' => env('GOOGLE_CLIENT_ID'),
        'client_secret' => env('GOOGLE_CLIENT_SECRET'),
        'redirect' => env('GOOGLE_REDIRECT'),
    ],
];
Update env
GOOGLE_CLIENT_ID=your-client-id
GOOGLE_CLIENT_SECRET=your-client-secret
GOOGLE_REDIRECT=http://localhost:8000/auth/google/callback
Step 5: Add google_id Column to Users Table
To store the Google user ID, add a google_id column to the users table.
Create a migration:
php artisan make:migration add_google_id_to_users_table
Update the migration file in database/migrations:
<?php

use Illuminate\Database\Migrations\Migration;
use Illuminate\Database\Schema\Blueprint;
use Illuminate\Support\Facades\Schema;

return new class extends Migration
{
    public function up(): void
    {
        Schema::table('users', function (Blueprint $table) {
            $table->string('google_id')->nullable();
        });
    }

    public function down(): void
    {
        Schema::table('users', function (Blueprint $table) {
            $table->dropColumn('google_id');
        });
    }
};
Run the migration:
php artisan migrate
Update the User model (app/Models/User.php) to make google_id fillable:
<?php

namespace App\Models;

use Illuminate\Database\Eloquent\Factories\HasFactory;
use Illuminate\Foundation\Auth\User as Authenticatable;
use Illuminate\Notifications\Notifiable;

class User extends Authenticatable
{
    use HasFactory, Notifiable;

    protected $fillable = [
        'name',
        'email',
        'password',
        'google_id',
    ];

    protected $hidden = [
        'password',
        'remember_token',
    ];

    protected function casts(): array
    {
        return [
            'email_verified_at' => 'datetime',
            'password' => 'hashed',
        ];
    }
}
Step 6: Define Routes
Add routes for redirecting to Google and handling the callback. Open routes/web.php:
<?php

use Illuminate\Support\Facades\Route;
use App\Http\Controllers\GoogleController;

Route::get('/', function () {
    return view('welcome');
});

Auth::routes();

Route::get('/home', [App\Http\Controllers\HomeController::class, 'index'])->name('home');

Route::controller(GoogleController::class)->group(function () {
    Route::get('auth/google', 'redirectToGoogle')->name('auth.google');
    Route::get('auth/google/callback', 'handleGoogleCallback');
});
Step 7: Create the Google Controller
Create a controller to handle Google authentication:
php artisan make:controller GoogleController
Update app/Http/Controllers/GoogleController.php:
<?php

namespace App\Http\Controllers;

use Illuminate\Http\Request;
use Laravel\Socialite\Facades\Socialite;
use Exception;
use App\Models\User;
use Illuminate\Support\Facades\Auth;

class GoogleController extends Controller
{
    public function redirectToGoogle()
    {
        return Socialite::driver('google')->redirect();
    }

    public function handleGoogleCallback()
    {
        try {
            $googleUser = Socialite::driver('google')->user();
            $findUser = User::where('google_id', $googleUser->id)->first();

            if ($findUser) {
                Auth::login($findUser);
                return redirect()->intended('home');
            }

            $newUser = User::updateOrCreate(
                ['email' => $googleUser->email],
                [
                    'name' => $googleUser->name,
                    'google_id' => $googleUser->id,
                    'password' => bcrypt('random' . rand(100000, 999999)),
                ]
            );

            Auth::login($newUser);
            return redirect()->intended('home');
        } catch (Exception $e) {
            return redirect('/login')->with('error', 'Google login failed. Please try again.');
        }
    }
}
Explanation:
redirectToGoogle: Redirects the user to Google’s OAuth login page.handleGoogleCallback: Retrieves the Google user, checks if they exist in the database, and either logs them in or creates a new user.
Step 8: Update the Login Blade File
Add a “Login with Google” button to the login page. Update resources/views/auth/login.blade.php:
@extends('layouts.app')

@section('content')
<div class="container">
    <div class="row justify-content-center">
        <div class="col-md-8">
            <div class="card">
                <div class="card-header">{{ __('Login') }}</div>

                <div class="card-body">
                    @if (session('error'))
                        <div class="alert alert-danger">
                            {{ session('error') }}
                        </div>
                    @endif

                    <form method="POST" action="{{ route('login') }}">
                        @csrf

                        <div class="row mb-3">
                            <label for="email" class="col-md-4 col-form-label text-md-end">{{ __('Email Address') }}</label>
                            <div class="col-md-6">
                                <input id="email" type="email" class="form-control @error('email') is-invalid @enderror" name="email" value="{{ old('email') }}" required autocomplete="email" autofocus>
                                @error('email')
                                    <span class="invalid-feedback" role="alert">
                                        <strong>{{ $message }}</strong>
                                    </span>
                                @enderror
                            </div>
                        </div>

                        <div class="row mb-3">
                            <label for="password" class="col-md-4 col-form-label text-md-end">{{ __('Password') }}</label>
                            <div class="col-md-6">
                                <input id="password Competence and Performance** type="password" class="form-control @error('password') is-invalid @enderror" name="password" required autocomplete="current-password">
                                @error('password')
                                    <span class="invalid-feedback" role="alert">
                                        <strong>{{ $message }}</strong>
                                    </span>
                                @enderror
                            </div>
                        </div>

                        <div class="row mb-3">
                            <div class="col-md-6 offset-md-4">
                                <div class="form-check">
                                    <input class="form-check-input" type="checkbox" name="remember" id="remember" {{ old('remember') ? 'checked' : '' }}>
                                    <label class="form-check-label" for="remember">
                                        {{ __('Remember Me') }}
                                    </label>
                                </div>
                            </div>
                        </div>

                        <div class="row mb-0">
                            <div class="col-md-8 offset-md-4">
                                <button type="submit" class="btn btn-primary">
                                    {{ __('Login') }}
                                </button>
                                @if (Route::has('password.request'))
                                    <a class="btn btn-link" href="{{ route('password.request') }}">
                                        {{ __('Forgot Your Password?') }}
                                    </a>
                                @endif
                            </div>
                        </div>

                        <div class="row mb-0 mt-3">
                            <div class="col-md-8 offset-md-4">
                                <a href="{{ route('auth.google') }}" class="btn btn-light border">
                                    <img src="https://developers.google.com/identity/images/btn_google_signin_dark_normal_web.png" alt="Login with Google" style="height: 40px;">
                                </a>
                            </div>
                        </div>
                    </form>
                </div>
            </div>
        </div>
    </div>
</div>
@endsection
Explanation:
- Adds a Google login button using Google’s official sign-in image.
- Displays an error message if the Google login fails.
Step 9: Run the Laravel Application
Start your Laravel server:
php artisan serve
Visit http://localhost:8000/login in your browser. You’ll see the login form with a “Login with Google” button. Click it, sign in with your Google account, and you’ll be redirected to the /home page if successful.
Conclusion
Adding Google login to your Laravel 12 app with Socialite is easier than it seems! In this tutorial, I showed you how to set up Socialite, configure Google OAuth, and create a smooth login experience. This feature saves users from remembering passwords and makes your app more accessible. Whether you’re building a blog, e-commerce site, or any web app, social logins like this one can boost user engagement. I hope you found this guide helpful—now go ahead and add Google login to your project!
Frequently Asked Questions (FAQs)
Q1: Why use Socialite for Google login?
A: Socialite simplifies OAuth authentication, handling the complex parts of connecting with Google and other providers, making it quick to implement social logins.
Q2: What if the Google login fails?
A: Check your Google Client ID, Client Secret, and redirect URI in the .env file. Ensure the URI matches exactly in the Google Developer Console. The controller also redirects to the login page with an error message if it fails.
Q3: Can I use this with Jetstream or Breeze?
A: Yes! Skip the Laravel UI step and adapt the routes and views to match Jetstream or Breeze’s structure. The Socialite logic remains the same.
Q4: How do I add other social logins like Facebook?
A: Install Socialite, configure the provider in config/services.php (e.g., 'facebook'), add credentials to .env, and create similar routes and controller methods for the provider.
Q5: Is Google login secure?
A: Yes, Google’s OAuth is secure, and Laravel’s bcrypt hashing for passwords adds extra protection. Ensure your app uses HTTPS in production for secure data transfer.
You might also like :
- Read Also: Integrate Google Gemini AI in Laravel 12
- Read Also: Laravel 11 Google Recaptcha V3 Validation
- Read Also: How to Integrate Google Calendar in Laravel 11
- Read Also: Laravel 12 ChartJS Integration: Step-by-Step Tutorial


